Have you ever wanted to create something special with your own hands? Making a DIY toy house is a fun and rewarding project that lets you bring your creativity to life.
Imagine having a unique little home for your toys that you built yourself—something your friends will admire and you’ll be proud of. In this guide, you’ll discover simple steps and useful tips to make your very own toy house, even if you’ve never tried DIY before.
Ready to turn your ideas into a charming miniature home? Let’s get started!

Credit: m.youtube.com
Materials Needed
Gathering the right materials is a crucial first step to making a toy house DIY project enjoyable and successful. Having everything ready keeps you focused and saves time. Plus, it helps you avoid last-minute runs to the store, which can kill your creative flow.
Basic Supplies
- Cardboard or wood sheets:These form the main structure. Cardboard is easier to cut and great for beginners, while wood offers durability.
- Glue:Choose a strong adhesive like wood glue or a hot glue gun for quick drying and firm hold.
- Scissors or craft knife:Essential for cutting your materials precisely. Always be careful and cut on a safe surface.
- Ruler and pencil:Use these to measure and mark your pieces accurately. Precise measurements make assembly smoother.
- Paint or markers:Add color and personality to your toy house. Water-based paints are safe and easy to clean.
Starting with these basics gives you a solid foundation. Have you ever noticed how skipping small tools like a ruler can make your project harder? Accurate cutting is key to a neat final product.
Optional Decorations
- Fabric scraps:Perfect for curtains or rugs, adding a cozy touch.
- Buttons and beads:Use them as doorknobs, flower pots, or decorative accents.
- Stickers or washi tape:Quick and easy way to add patterns and fun details.
- Small twigs or popsicle sticks:Great for fences, railings, or roofing textures.
- Glitter or sequins:If you want to add some sparkle, these can make your toy house stand out.
Think about what makes your toy house unique. What small details would excite a child or spark your own creativity? Adding optional decorations is your chance to personalize and bring your project to life.
Choosing A Design
Choosing the right design is the first step to making a fun and charming toy house. The design sets the mood and style of the project. It also decides how simple or detailed the building process will be. Picking a clear design saves time and makes the crafting more enjoyable.
Simple Shapes
Simple shapes work best for beginners and quick projects. Basic forms like squares, rectangles, and triangles create easy-to-build houses. These shapes need fewer cuts and less assembly. Simple designs allow focus on painting and decoration. They also fit well in small spaces.
- Square or rectangular base
- Triangle roof
- Easy door and window shapes
- Minimal parts for fast build
Creative Themes
Creative themes add personality to the toy house. Themes can reflect interests or stories. Popular ideas include fairy tales, nature, or modern styles. Themes guide color choices and decorations. They make the toy house more special and fun to play with.
- Fairy tale castle with turrets
- Treehouse with leaves and branches
- Modern house with clean lines
- Beach hut with bright colors
Cutting And Assembling
Cutting and assembling are key parts of making a toy house DIY project. These steps shape your materials and bring the house to life. Careful cutting and strong assembly ensure your toy house is sturdy and fun to use.
Measuring And Cutting
Start by measuring each piece accurately. Use a ruler or tape measure for exact lines. Mark the cutting spots clearly with a pencil. Choose the right tools like a craft knife or small saw. Cut slowly along the lines to avoid mistakes. Smooth rough edges with sandpaper for a clean finish.
Gluing And Securing
Arrange the cut pieces before gluing to check the fit. Use wood glue or strong craft glue for best results. Apply glue evenly on joining surfaces. Press pieces firmly together and hold for a few minutes. Use clamps or rubber bands to keep parts tight while drying. Let the glue dry completely before moving to the next step.

Credit: www.youtube.com
Painting And Decorating
Creating a toy house DIY involves choosing bright colors and simple designs. Use safe paints and decorate with easy patterns for a fun, personal touch. Painting small details brings the toy house to life and sparks creativity.
Painting and decorating your DIY toy house can transform it from a simple structure into a vibrant, personalized play space. The choices you make here can spark creativity and imagination, making the toy house a cherished item for years to come. Whether you want a whimsical fairy tale look or a sleek modern design, the painting and decorating phase is where the magic happens.Selecting Colors
Choosing the right colors is crucial. Think about the overall theme or mood you want to create. Bright, bold colors can bring energy and excitement, while softer, pastel shades may offer a calming, serene vibe. Consider involving your child in the color selection process. This can be a fun and engaging way to ensure the toy house reflects their personality and preferences. You could even assign different colors to specific parts of the house, like a red door for a pop of contrast or a blue roof to mimic the sky.Adding Details
Details make all the difference. After selecting your base colors, think about small accents that can bring your toy house to life. Use stencils or stickers to add patterns or characters to the walls. These can be as simple as polka dots or as intricate as forest animals, depending on your artistic confidence and your child’s interests. Don’t forget about functional details. Adding small flower boxes, window shutters, or even a tiny welcome mat can enhance the realism and charm of the house. You might even personalize it further with your child’s name on the mailbox or above the door. What small details will make your toy house unique and special?Adding Furniture And Accessories
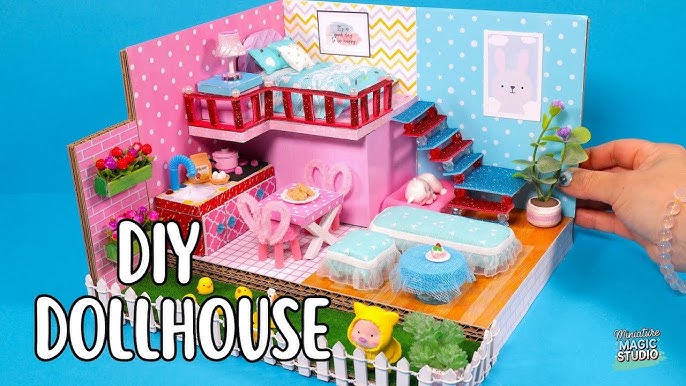
Adding furniture and accessories brings your DIY toy house to life. It transforms empty spaces into cozy corners where imagination can run wild. Simple touches like a tiny chair or a handmade rug make the play experience much richer and more personal.
Diy Furniture Ideas
You don’t need fancy tools to create charming furniture for your toy house. Small wooden blocks can become stools or tables with a bit of paint and sanding. Cardboard is another fantastic material; fold it carefully to craft beds, shelves, or even a little sofa.
Consider using bottle caps as tiny chairs or buttons as cushions. These everyday items add character and encourage kids to look around their home for new furniture ideas. Have you ever tried making a miniature bookshelf from popsicle sticks? It’s easier than you think and adds so much detail.
Creative Accessories
Accessories complete the look and invite storytelling. Fabric scraps turn into curtains, rugs, or pillows, giving each room its own personality. You can also create tiny picture frames by cutting out photos or drawing simple art on paper.
Don’t forget about lighting—small LED tea lights add a magical glow. What about miniature plants? Use moss or tiny twigs to simulate greenery. These small touches make your toy house feel lived-in and loved.
Safety Tips
Building a toy house at home can be fun and rewarding. Safety must be the top priority during the process. Careful attention avoids accidents and keeps everyone safe. Knowing the right safety tips makes the project smoother and more enjoyable.
Safe Tools Use
Always choose tools that fit your skill level. Use sharp blades carefully to avoid slips. Keep tools clean and in good shape. Store tools safely after use. Wear protective gear like gloves and goggles. Work in a well-lit area to see clearly. Never leave tools where children can reach them.
Non-toxic Materials
Select paints, glues, and finishes labeled as non-toxic. Avoid materials with strong chemical smells. Test small amounts on a piece of scrap wood first. Use water-based products whenever possible. Keep materials out of reach of children during and after use. Proper ventilation helps reduce fumes. This keeps your toy house safe for kids to play with.
Encouraging Creativity
Encouraging creativity is a key part of making a toy house DIY project special. It helps kids think freely and use their imagination. This process builds confidence and makes the activity more fun. Simple choices can spark new ideas and bring personal touches to the toy house.
Personalizing Your Toy House
Adding personal details makes the toy house unique. Choose colors and decorations that reflect personality. Use stickers, paint, or fabric to decorate walls and furniture. Small details like curtains or rugs can add charm. Personalization invites creativity and makes the toy house feel special.
Involving Kids In The Process
Letting kids join the building process boosts their creativity. They can help pick materials and design ideas. Encourage them to share thoughts and try new things. This hands-on experience teaches problem-solving and decision-making. Kids feel proud when they see their ideas come to life.

Credit: www.youtube.com
Frequently Asked Questions
What Materials Are Needed To Make A Diy Toy House?
To make a DIY toy house, you need cardboard, glue, scissors, paint, and decorative items. These materials are affordable and easy to find. You can also use recycled materials to make it eco-friendly and unique.
How Long Does It Take To Build A Toy House Diy?
Building a DIY toy house typically takes 2 to 4 hours. The time depends on the complexity of the design and drying time for glue and paint. Simple models can be completed faster, while detailed ones require more time.
Can Children Safely Make A Toy House Diy?
Yes, children can safely make a toy house with adult supervision. Use child-friendly scissors and non-toxic glue or paint. This project encourages creativity and improves fine motor skills in a safe environment.
What Are Some Creative Decoration Ideas For Toy Houses?
Use colorful paints, stickers, fabric scraps, and small toys to decorate your DIY toy house. Adding miniature furniture or LED lights can enhance its look. Personalize it to make the toy house unique and fun.
Conclusion
Building a toy house yourself is fun and rewarding. You only need simple materials and patience. Step-by-step, you create something special for kids or gifts. This project helps improve your crafting skills and creativity. Plus, it saves money compared to buying ready-made toys.
Try different designs and colors to make it unique. Enjoy the process and share your creation with friends or family. Making a toy house DIY brings joy and pride. Give it a try today and see the results!