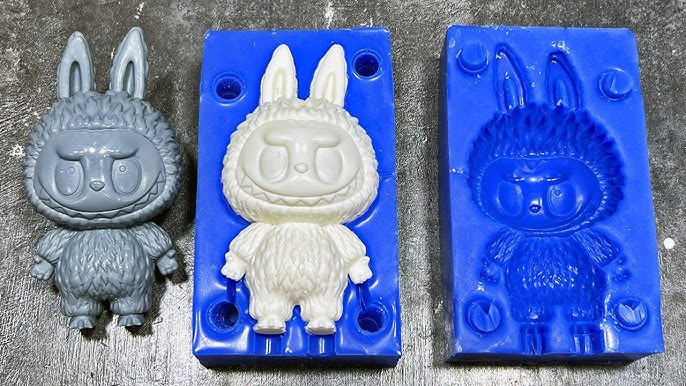
Have you ever wanted to create your own plastic toys but thought the process was too hard or expensive? What if you could make a custom toy mold right at home, using simple tools and materials?
In this guide, you’ll discover step-by-step how to DIY a plastic toy mold easily and affordably. Whether you’re a hobbyist, a parent looking for a fun project, or someone curious about crafting, this method puts the power in your hands.
Keep reading, and you’ll be surprised how simple and satisfying it is to bring your toy ideas to life.
Materials Needed
Gathering the right materials is key to creating a successful plastic toy mold. The quality of your materials directly impacts the detail and durability of your finished toy. Before you start molding, make sure you have everything you need on hand to avoid interruptions.
Choosing The Right Plastic
Not all plastics are equal when it comes to toy molds. You want a plastic that melts evenly and hardens quickly without warping. Common choices include polyethylene, polypropylene, and ABS plastic. Each offers different flexibility and strength, so think about how your toy will be used.
Have you considered which plastic matches your toy’s design? For small, detailed toys, ABS plastic works well because it captures fine details. If your toy needs to be flexible, polyethylene might be better.
Essential Tools And Supplies
Besides plastic, you’ll need several tools to shape and handle your mold effectively. A heat source like a hot plate or oven is necessary to melt the plastic safely. You’ll also need a mold box, release agent, mixing sticks, and measuring tools for precision.
Don’t forget silicone rubber if you plan to make reusable molds. Its flexibility helps when removing the finished toy without damage. Having a clean workspace with paper towels and containers can save you a lot of frustration.
Safety Gear
Working with molten plastic can be dangerous without proper protection. Always wear heat-resistant gloves to prevent burns and safety goggles to protect your eyes from splashes. A respirator mask is also useful to avoid inhaling any fumes.
Have you prepared a well-ventilated area for your project? Good airflow reduces the risk of breathing in harmful chemicals. Safety gear might feel like an extra step, but it ensures your DIY experience stays safe and enjoyable.
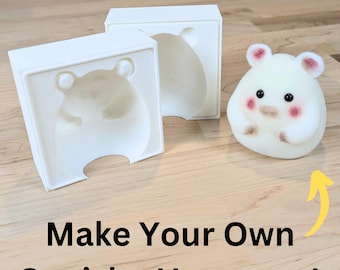
Credit: www.etsy.com
Designing Your Toy
Designing your toy is the foundation of creating a successful plastic toy mold. This phase turns your ideas into tangible shapes and defines how your final product will look and feel. Paying attention to detail now saves time and materials later during molding and production.
Sketching Your Model
Start with simple sketches to get your ideas on paper. Draw your toy from different angles to capture all the features and proportions clearly.
Use pencils so you can easily adjust lines. Don’t worry about perfection; focus on capturing the essence of your design.
Ask yourself: What makes this toy unique? How will its shape affect molding? These questions guide your creativity and practicality.
Creating A Prototype
After sketching, build a basic prototype using clay, foam, or 3D printing. This step helps you see your design in three dimensions and test its feel and size.
Hold the prototype and imagine how it will be handled by kids or collectors. Small changes now can improve comfort and durability.
Try simple prototypes before moving to complex ones. It saves time and helps you spot design flaws early.
Selecting Mold Type
Choosing the right mold type depends on your toy’s design complexity and production needs. Common options include injection molds, compression molds, and rotational molds.
- Injection moldingis great for detailed designs and mass production.
- Compression moldingworks well for simpler shapes and smaller batches.
- Rotational moldingcreates hollow parts, ideal for lightweight toys.
Think about your budget and how many toys you want to make. Which mold type offers the best balance between cost and quality for your project?
Preparing The Mold
Preparing the mold is a crucial phase in making your own plastic toy mold. This step sets the foundation for how well your final toy will turn out. Careful attention during preparation can save you from common mistakes and ensure your mold captures every detail perfectly.
Making The Mold Base
The mold base acts as the sturdy frame that holds everything together. Use a flat, solid surface like a wooden board or a thick acrylic sheet. Make sure it is clean and level to avoid uneven molding.
Attach a border around the base using materials like foam or plastic strips. This border will contain the mold material, preventing leaks. I once skipped this and ended up with a messy spill that wasted mold material and time—don’t make the same mistake.
Shaping The Mold Cavity
The mold cavity is where your toy’s shape will be formed. Position your original toy or model securely inside the mold base. If it’s small or delicate, use a small amount of adhesive putty to keep it steady.
Pour your mold material slowly around the toy, avoiding air bubbles by pouring in one spot and letting it flow naturally. Have you noticed how air bubbles can ruin fine details? Tap the base gently to help bubbles rise to the surface and pop.
Adding Release Agents
Release agents are essential to prevent your plastic toy from sticking to the mold. Use a spray or brush-on silicone-based release agent for best results. Apply it evenly on both the original toy and inside the mold cavity before pouring plastic.
Without a proper release agent, you might find yourself prying your toy out with force, risking damage. I learned this the hard way when my first mold stuck like glue. Protect your work by never skipping this step.

Credit: www.youtube.com
Casting The Plastic
Casting the plastic is where your toy really starts to take shape. It’s the moment when molten material fills your mold and transforms into the form you’ve designed. Getting this part right ensures a smooth, detailed, and durable toy that you’ll be proud of.
Melting The Plastic
Choose the right type of plastic for your toy mold, like polyethylene or polypropylene, which melt at relatively low temperatures. Use a heat source that allows you to control the temperature precisely, such as a small electric furnace or a hot plate with a temperature gauge.
Heat the plastic slowly and evenly to avoid burning or degrading it. Stir occasionally with a heat-resistant tool to help it melt uniformly. Have you noticed how uneven heating can cause bubbles or weak spots in your cast? That’s why patience here pays off.
Pouring Techniques
Pour the molten plastic steadily and from a low height to prevent air bubbles from forming inside the mold. If your mold has intricate details, try tilting it slightly while pouring to help the plastic reach every nook and cranny.
Use a slow and controlled pour rather than dumping the plastic quickly. This reduces splashing and potential defects. A helpful tip: tap the mold gently after pouring to release trapped air bubbles and improve the finish.
Cooling And Setting
Allow the plastic to cool naturally at room temperature. Avoid rushing the process by using fans or cold water, as rapid cooling can cause warping or cracks.
Once the toy feels solid to the touch, leave it in the mold a bit longer to ensure complete setting. How long you wait can vary depending on the plastic type and thickness, so keep notes for next time to perfect your timing.
Finishing Touches
Smooth out rough edges and remove excess plastic for a clean finish. Use fine sandpaper or a small file to perfect the toy’s shape. Careful attention makes the toy safe and ready to play with.
The ‘Finishing Touches’ phase is where your plastic toy truly comes to life. This is the stage where you transform a raw mold into a polished masterpiece that excites and delights. It’s all about attention to detail and adding personality to your creation.Removing The Toy From Mold
Carefully remove your toy from the mold, ensuring you don’t damage its shape. Gently flex the mold if it’s flexible, or tap the sides if it’s rigid. Use your fingers to softly nudge the toy out, avoiding any sharp tools that might scratch or break it.Trimming And Cleaning
Once out, examine the toy for any excess plastic or rough edges. Use a craft knife or fine sandpaper to carefully trim these areas. A smooth surface not only looks better but also makes painting easier.Painting And Decorating
Here’s where you can let your creativity shine. Choose colors that make your toy pop, or add detailed designs for a personalized touch. Acrylic paints work great, and don’t forget a clear sealant to protect your artwork. Taking the time to perfect these finishing touches can significantly enhance the quality of your DIY toy. What unique elements will you add to make your creation stand out?
Credit: www.youtube.com
Troubleshooting Tips
Troubleshooting your DIY plastic toy mold can feel frustrating, but it’s a crucial part of making a quality final product. Many issues arise from small mistakes or overlooked details during the molding process. Understanding these common problems and how to fix them will save you time and materials.
Common Mold Issues
Have you ever noticed bubbles or rough spots on your molded toy? These are typical problems caused by air trapped in the mold or uneven mixing of materials. Warping is another issue, often due to uneven cooling or using the wrong type of plastic.
Sticky molds that don’t release the toy properly can be a sign of insufficient mold release agent or damage to the mold surface. Cracks or weak points often come from improper curing times or temperatures.
Fixing Imperfections
To fix bubbles, try tapping the mold gently after pouring the plastic to release trapped air. Using a vacuum chamber before pouring can also help reduce air pockets.
For rough edges or flashing, carefully trim with a sharp craft knife or fine sandpaper once the toy is cured. If your mold causes warping, adjusting the cooling time or placing the mold in a stable, flat position during curing helps maintain shape.
Sticky molds benefit from applying a thin layer of mold release spray before each use. You can also polish the mold surface with a soft cloth to smooth out minor imperfections.
Improving Mold Durability
Want your mold to last through many uses? Using high-quality silicone or resin for your mold base is key. Avoid sharp tools on the mold surface, as scratches weaken the material over time.
Store your molds in a cool, dry place away from direct sunlight. This prevents degradation and maintains flexibility. Regular cleaning with mild soap and water keeps residue from building up, which can cause sticking and damage.
Think about reinforcing the mold edges with a sturdy frame or casing. This provides extra support and reduces the risk of tears during handling.
Frequently Asked Questions
What Materials Are Needed For A Diy Plastic Toy Mold?
You need silicone rubber, plastic pellets, a mold box, and a release agent. These materials ensure a flexible mold and smooth toy surface. Safety gloves and a mixing tool are also essential for handling and preparing materials properly.
How Do You Create A Mold For Plastic Toys?
First, sculpt or choose a master model. Then, place it in the mold box and pour silicone rubber over it. Let it cure fully before removing the mold. This process captures fine details for accurate toy replication.
What Types Of Plastic Work Best For Toy Molds?
Thermoplastics like polyethylene and polypropylene are ideal. They melt easily and fill molds smoothly. These plastics are durable, safe for children, and widely available for DIY projects.
How Long Does It Take To Make A Plastic Toy Mold?
Creating and curing the silicone mold typically takes 24 to 48 hours. Plastic injection or casting time varies from minutes to a few hours. The total time depends on mold complexity and plastic type.
Conclusion
Creating a plastic toy mold yourself is easier than you think. Small steps lead to great results. Use safe materials and follow instructions closely. Practice helps improve your molding skills over time. Enjoy the fun of making your own toys at home.
Keep experimenting and learning with each project. This DIY skill saves money and sparks creativity. Try different shapes and designs for variety. Your homemade toys will bring joy and pride. Start today and see what you can create!


