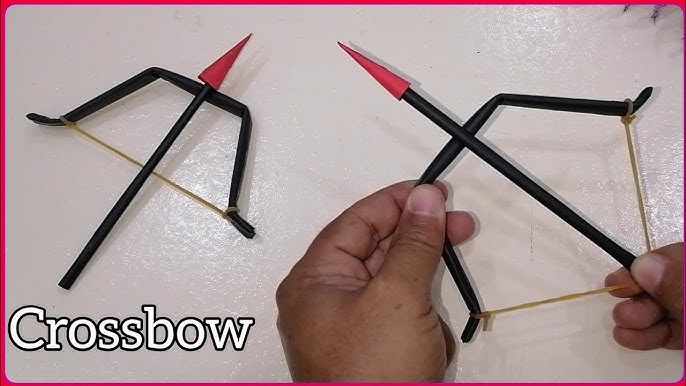
Have you ever wanted to create a fun, safe toy that you can make with your own hands? Imagine building a paper crossbow and arrows that you can proudly show off to your friends.
It’s easier than you think, and you don’t need any special tools or materials. This creative project will not only keep you entertained but also help you learn about simple mechanics and design. Ready to discover how you can turn ordinary paper into an exciting, working toy?
Keep reading, and you’ll be amazed at what you can make!
Materials Needed
Gathering the right materials is key to making a paper crossbow and arrows. Using suitable paper and supplies ensures your toy is sturdy and fun to use. This section breaks down the materials you need for this creative project.
Paper Types
- Cardstock: Thick and strong, perfect for the crossbow frame.
- Construction Paper: Bright colors, easy to fold for arrows and details.
- Printer Paper: Lightweight, good for quick prototypes and arrow fletching.
- Origami Paper: Thin and crisp, ideal for precise folds on arrows.
Additional Supplies
- Scissors: Sharp blades help make clean cuts.
- Glue Stick or Liquid Glue: Holds paper parts firmly together.
- Rubber Bands: Provide tension for the crossbow string.
- Wooden Skewers or Toothpicks: Serve as arrow shafts for strength.
- Markers or Colored Pencils: Add decoration and details.
- Ruler: Measures paper pieces accurately.
- Pencil: Marks cutting and folding lines.
Preparing The Paper
Preparing the paper is the first and most important step in making a paper crossbow and arrows. The right preparation ensures your toy is strong and works well. Using proper cutting and folding techniques helps create clean shapes and precise parts. Reinforcing the paper adds durability, so your crossbow lasts longer and shoots better. Follow these tips to prepare your paper perfectly for crafting your creative toy.
Cutting And Folding Techniques
Start by using sharp scissors or a craft knife. Cut along the lines carefully to keep the edges neat. Straight, clean cuts make folding easier and more accurate.
Fold the paper crisply. Use a ruler or a flat edge to press the folds firmly. This creates sharp creases that help the parts fit together well.
For arrows, fold the paper tightly to keep them slim and straight. Use small, precise folds for better balance and flight.
Reinforcing Paper For Strength
Thin paper can tear easily. Reinforce it by layering two sheets together with glue. This makes the paper thicker and stronger.
Use clear tape on edges and folds to prevent ripping. Tape adds extra support without changing the shape.
For the crossbow’s main body, consider folding paper into strips and gluing them side by side. This technique boosts firmness and stability.
Building The Crossbow Frame
Building the crossbow frame is where your paper creation starts to take shape. It sets the foundation for a sturdy and functional toy that you’ll enjoy crafting and playing with. Paying attention to how you structure the frame will make your crossbow both strong and easy to handle.
Creating The Main Body
Begin with a thick sheet of paper or light cardstock to form the main body. Fold it carefully into a long, rectangular shape, about the length of your hand. This will act as the handle and base, so make sure the folds are crisp and firm.
Reinforce the body by layering two or three folded sheets together. This prevents bending when you pull back the string later. Don’t forget to crease the edges sharply; it adds to the frame’s durability.
Have you noticed how a solid base changes the feel of your toy? It makes aiming easier and playing more fun.
Adding The Bow Arms
Next, cut two narrow strips of paper to serve as the bow arms. These should be slightly curved to create tension when you attach the string. Gently bend each strip with your fingers to get a smooth arc.
Attach the arms to each end of the main body using glue or tape. Position them so they extend outward, forming a “Y” shape with the handle. It’s important they’re symmetrical; uneven arms can cause your crossbow to shoot off target.
Secure the joints firmly to avoid any wobbling. You can add small paper reinforcements at the connection points for extra strength. Think about how the arms will hold the tension—would you trust a frame that looks flimsy?
Crafting The Bowstring
Crafting a paper crossbow and arrows is a fun and creative project. It involves folding and cutting paper to create a functional toy. This activity encourages creativity and improves hand-eye coordination.
Crafting the bowstring for your paper crossbow is a crucial step. It ensures the toy works effectively and adds to the overall excitement. A well-crafted bowstring makes the difference between a limp arrow and a soaring one. This part of the process requires attention to detail and the right materials. Let’s dive into how you can create a strong, reliable bowstring.Choosing The Right String
Selecting the appropriate string is vital. A sturdy string will enhance your crossbow’s performance. Look for materials like cotton thread, dental floss, or fishing line. These options offer strength and flexibility. Avoid using anything too thick or too thin. The balance of strength and tension is key.Attaching The String Securely
Proper attachment ensures the string stays in place. First, measure the length of your crossbow’s arms. Cut the string slightly longer than the arms’ length. Tie a secure knot at each end of the crossbow arms. Double-check the knots to ensure they won’t slip. Pull the string taut to test its strength. A well-secured string will handle the tension without breaking.Making Paper Arrows
Making paper arrows is a fun and creative part of building your paper crossbow. The arrows need to be light yet sturdy. Crafting the shafts and tips carefully helps the arrows fly better. You can customize the design for a personal touch. Follow simple steps to fold and shape each arrow perfectly.
Folding Arrow Shafts
Start with a long, narrow strip of paper. Fold it tightly from one end to the other. Keep the folds even to make the shaft strong. Press firmly on each fold to hold the shape. The shaft should be straight and slim. Trim any uneven edges for a neat finish. This creates a lightweight and balanced arrow shaft.
Designing Arrow Tips And Fletching
Cut small triangles from paper for the arrow tips. Glue or tape the tip to one end of the shaft. Make sure it is secure but not too heavy. For fletching, cut thin strips of paper into feathers. Attach three or four feathers evenly around the other end of the shaft. This helps the arrow fly straight. Use bright colors for a creative look.

Credit: www.youtube.com
Assembling The Crossbow
Assembling the crossbow is where your creative toy really starts to take shape. This stage requires patience and careful attention to how each part fits together. Taking your time here ensures your paper crossbow will be both fun and functional.
Connecting Components
Begin by aligning the main body and the bow arms carefully. Use strong tape or glue to secure the arms to the base firmly. Make sure the arms are symmetrical; uneven arms can affect the crossbow’s balance and shooting accuracy.
Attach the trigger mechanism next. This usually involves a small paper lever or clip that holds and releases the arrow. Test the trigger by gently pulling it back and releasing it to see if it snaps smoothly.
Pay attention to the tension in the rubber band or string that acts as the bowstring. It should be tight enough to launch arrows but not so tight that it strains the paper parts. Adjust it by twisting or repositioning until you get the right tension.
Testing Mechanism
Once assembled, it’s time to test how well your crossbow shoots. Find a safe, open space and aim at a soft target like a pillow or cardboard. This helps prevent damage and keeps things safe.
Observe how far and straight your arrows fly. If they veer off or fail to shoot properly, check the alignment of your bow arms and the tension of the string. Small tweaks here can make a big difference.
Ask yourself: Does the trigger release smoothly, or does it catch? If it catches, slightly adjust the paper lever until it moves freely. This simple test-run is key to turning your paper parts into a working toy.
Safety Tips
Creating a paper crossbow and arrows can be a fun and rewarding project. However, safety should always come first to ensure everyone enjoys the activity without any accidents. Paying attention to safety tips helps prevent injuries and keeps the experience positive for both kids and adults.
Safe Usage Guidelines
Always aim the paper crossbow away from faces, pets, and fragile objects. Even though it’s made of paper, the arrows can still cause minor injuries or damage. Use soft targets like paper or cardboard to practice shooting.
Check your surroundings before shooting. Make sure there’s a clear area behind your target to catch any stray arrows. Avoid shooting indoors near windows or valuable items.
Keep the crossbow and arrows in good condition. Torn or bent paper can make the arrows fly unpredictably. Replace damaged parts to maintain control and accuracy.
Supervision Recommendations
If children are involved, always supervise their play with the paper crossbow. Kids might not realize the potential risks and could aim at unsafe targets. Your presence helps guide them toward responsible use.
Explain the rules clearly before starting the activity. For example, no aiming at people or animals and no shooting indoors without permission. Setting boundaries helps prevent misunderstandings and accidents.
Encourage kids to take turns and share the equipment. This teaches patience and respect while reducing the chance of hurried or careless shots. Have you noticed how supervision turns a simple toy into a safe learning experience?

Credit: www.youtube.com
Creative Variations
Adding creative variations to your paper crossbow and arrows transforms a simple craft into a personal project full of fun and imagination. These tweaks not only enhance the look but also make the toy more enjoyable to use and show off. How you choose to decorate and customize can reflect your style and encourage you to experiment with new ideas.
Decorating Your Crossbow
Start by choosing colors that catch your eye. Bright markers, colored pencils, or even watercolors can bring your crossbow to life.
Try adding patterns like stripes, dots, or zigzags. You might even draw tiny symbols or shapes that mean something special to you.
To give it texture, glue small pieces of fabric or paper cutouts on the arms or the handle. This makes the crossbow feel more realistic and fun to hold.
Think about using stickers or washi tape for quick and easy decoration that still looks cool. What if you create a theme, like a superhero or medieval style? This can make your crossbow unique and a real conversation starter.
Customizing Arrow Designs
Your arrows can be just as creative as the crossbow. Try using different colored paper for each arrow to tell them apart during a game.
Experiment with the arrow tips by folding the paper in various shapes—triangles, diamonds, or even tiny hearts. This not only changes how they look but can affect how they fly.
Adding small feathers or paper fins at the back can improve the arrow’s flight and add a cool visual effect.
Label your arrows with fun names or numbers. You might find that naming your arrows makes your playtime more exciting and personal.
Have you thought about combining these ideas? Maybe a brightly decorated crossbow with uniquely tipped arrows could become your signature style. What other creative touches can you imagine adding?

Credit: www.youtube.com
Frequently Asked Questions
How Do I Make A Paper Crossbow Step-by-step?
Start with sturdy paper and fold it into a bow shape. Attach a rubber band for tension. Create an arrow using a paper strip. Secure all parts with tape or glue carefully. Follow safety tips to avoid injuries.
What Materials Are Needed For A Paper Crossbow?
You need thick paper or cardstock, rubber bands, tape or glue, scissors, and a ruler. Optional materials include paper clips or toothpicks for arrow tips. These simple items help create a functional and creative toy crossbow.
How Can I Make Paper Arrows For The Crossbow?
Cut strips of paper about 6 inches long. Fold one end to create a pointed tip. Optionally, add small paper fletchings at the back for stability. Make sure arrows fit the crossbow’s size for better shooting.
Is Making A Paper Crossbow Safe For Kids?
Yes, if done under adult supervision. Use soft paper arrows to avoid injuries. Avoid aiming at people or animals. Always follow safety rules and use the toy responsibly.
Conclusion
Making a paper crossbow and arrows is fun and simple. It helps you learn creativity and patience. You only need paper and a few tools. Kids and adults can enjoy crafting this toy together. It encourages safe play and imagination.
Try making different designs to see what works best. Keep practicing to improve your skills. This project makes a great gift or party activity. Give it a try and enjoy the process!


