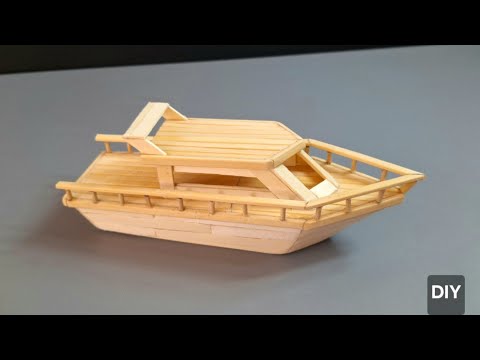
Have you ever wanted to create something fun and simple with your own hands? Making a DIY toy boat is a perfect way to do just that.
It’s easy, enjoyable, and gives you a cool little boat you can actually play with. Whether you’re looking for a fun project to do alone or with your kids, this guide will show you step-by-step how to build your very own toy boat.
Ready to start? Let’s dive in and turn your creativity into a floating masterpiece!
Materials Needed
Before you start building your DIY toy boat, gathering the right materials is key to making the process smooth and enjoyable. Having everything ready helps you stay focused and makes the project more fun. Let’s break down what you’ll need to bring your little boat to life.
Basic Supplies
- Wood or Foam Base:Choose a lightweight piece like balsa wood, craft foam, or even a small block of cork. These materials are easy to cut and shape, perfect for your boat’s hull.
- Glue:Use a strong adhesive like wood glue or hot glue to hold your parts together securely.
- Scissors or Craft Knife:Sharp tools will help you cut your materials precisely. Always be careful and ask for help if needed.
- Sandpaper:Smooth the edges of your boat for a clean finish and to avoid splinters.
- Paint or Markers:Add color and personality to your toy boat with water-based paints or permanent markers.
- Straws or Skewers:These work great as masts to hold sails.
- Paper or Fabric:For making sails, lightweight paper or thin fabric pieces are ideal.
Optional Decorations
- Stickers:Add fun shapes or nautical themes to your boat’s surface.
- Glitter or Sequins:Make your boat sparkle and catch the light on the water.
- Buttons or Beads:Use these as decorative elements like portholes or boat knobs.
- String or Yarn:Perfect for rigging the sails or creating ropes.
- Small Flags or Paper Cutouts:Personalize your boat with flags or symbols that mean something to you.
Have you ever thought about how the materials you choose affect your boat’s performance? Lightweight and waterproof elements can help your toy sail better. What materials do you already have around that could work for your boat project?

Credit: www.youtube.com
Choosing The Right Design
Choosing the right design is key to making a fun and functional DIY toy boat. The design affects how easy it is to build and how well it floats. Pick a shape that matches your skills and the materials you have. This choice sets the tone for the whole project.
Simple Shapes
Simple shapes are perfect for beginners. They use basic forms like rectangles, triangles, and ovals. These shapes are easy to cut and assemble. They also float well and stay balanced in water.
- Rectangle hulls offer stability.
- Triangle sails catch wind easily.
- Ovals give smooth movement.
Choosing simple shapes speeds up the building process. It also helps avoid frustration. A straightforward design ensures your boat works well on water.
Creative Variations
Creative variations add personality and fun to your toy boat. Try mixing simple shapes or adding unique features. For example, add a small cabin, flag, or multiple sails.
- Combine rectangles and circles for a unique hull.
- Add colorful decorations for visual appeal.
- Experiment with different sizes of sails.
Creative designs may need more skill and time. They make your boat stand out and spark imagination. Choose variations that match your comfort level and tools.
Step-by-step Assembly
Building a DIY toy boat is a fun and rewarding project. Follow the simple steps below to create a boat that floats and sails. Each stage is important for a sturdy and attractive final product.
Cutting And Shaping
Start by selecting a lightweight wood or foam board. Use a pencil to draw the boat’s outline. Cut carefully along the lines with a craft knife or small saw. Smooth the edges with sandpaper to avoid splinters. Shape the hull so it is wide at the bottom and narrow at the top. This design helps the boat stay balanced on water.
Assembling The Parts
Gather all the cut pieces for the boat’s body. Use waterproof glue to attach the hull sides to the base. Hold the pieces firmly until the glue sets. Add extra support by gluing small wooden sticks inside the hull. This keeps the structure strong. Let the glue dry completely before moving on.
Adding The Sail
Cut a small rectangle from a piece of fabric or paper for the sail. Attach the sail to a thin stick or skewer to act as the mast. Secure the mast upright in the boat’s base using glue or by poking a small hole. Adjust the sail so it catches wind easily. This simple addition will let your toy boat sail smoothly on water.

Credit: www.youtube.com
Painting And Decorating
Create a simple toy boat using basic painting and decorating skills. Choose bright colors to make your boat look fun and lively. Use easy brush strokes for a neat finish that kids will love.
Painting and decorating your DIY toy boat is where the magic truly happens. This step transforms a simple craft into a unique masterpiece that reflects your creativity. With a few thoughtful choices, you can ensure your boat is not only beautiful but also safe for play.Safe Paint Choices
When selecting paint, safety should be your priority, especially if children will handle the boat. Choose non-toxic, water-based paints that are safe for kids. Acrylic paints are a popular choice as they are easy to clean up and come in a variety of vibrant colors. Consider using natural dyes for an eco-friendly approach. Vegetable-based dyes can offer a rustic, earthy finish. Always read the labels to ensure the product is free from harmful chemicals.Creative Decoration Ideas
Let your imagination run wild with decoration ideas. Add stripes or polka dots to give your boat a lively look. Use stencils for precise patterns if freehand painting isn’t your strong suit. Incorporate natural elements like small leaves or twigs to add texture. You could glue on tiny seashells or beads for a nautical theme. This not only enhances the visual appeal but also adds a touch of personal flair. What about a name for your boat? Use a fine brush to write it on the hull. A unique name adds character and tells a story every time someone sets eyes on your creation. Decorating your boat is more than just painting; it’s about adding your personal touch. What story will your toy boat tell?Testing The Toy Boat
Testing your DIY toy boat is the moment where your creativity meets reality. It’s exciting to see if your design floats and sails as you imagined. This step helps you spot what works well and what needs a little tweak to make your boat perfect.
Float Test
Start by placing your toy boat gently on the water surface. A calm pond, bathtub, or even a large bowl can work well. Watch closely—does your boat sit evenly on the water, or does it tip to one side?
If it sinks or tilts, don’t worry. This is your chance to learn how the materials and design interact with water. Try to notice if the boat’s bottom is too heavy or if there’s water leaking inside.
Balancing And Adjustments
Balance is key to a smooth sail. Add small weights like coins or pebbles inside the boat to counterbalance any tilt. Place them strategically, and test your boat again after each adjustment.
Have you considered trimming parts that are too heavy or adjusting the sail’s position? These small changes can make a big difference. Keep testing until your boat floats steady and moves as you want.
Learning Through Play
Learning through play is a powerful way for children to explore and understand the world. Making a DIY toy boat lets kids learn by doing. It helps them grasp ideas while having fun. This hands-on activity connects play with real-life lessons.
Basic Physics Concepts
Building a toy boat introduces simple physics ideas. Kids see how objects float or sink in water. They learn about balance and weight. Watching the boat move teaches about water resistance and force. These concepts become clear through play, not just books.
Encouraging Creativity
Making a toy boat allows children to use their imagination. They choose colors, shapes, and materials. This freedom sparks original ideas and problem-solving skills. Each boat becomes unique, showing the child’s personality. Creativity grows as they experiment and try new designs.
Troubleshooting Common Issues
Troubleshooting is key to a fun and successful DIY toy boat project. Small problems can stop your boat from floating or sailing well. Fixing these issues early keeps the boat working and the fun going.
Understanding common problems helps you build better boats next time. Here are solutions for some usual troubles.
Boat Sinking
Sinking happens when water leaks inside or the boat is too heavy. Check the boat’s base for cracks or holes. Seal any openings with waterproof glue or tape. Use light materials like balsa wood or foam to keep the boat buoyant.
Balance the weight by spreading parts evenly. Avoid heavy decorations that pull the boat down. Test the boat in shallow water to find leaks fast. Fix leaks quickly to stop water from entering again.
Sail Problems
Sails may not catch wind properly or tear easily. Make sure the sail material is light but strong, like paper or thin cloth. Attach the sail firmly to the mast using glue or string. Check that the mast stands straight and is not loose.
Adjust the sail angle to catch the wind better. A sail too flat or too loose won’t work well. Trim torn edges or replace the sail if it gets damaged. Practice changing the sail position to improve boat speed and control.

Credit: www.youtube.com
Frequently Asked Questions
What Materials Do I Need For A Diy Toy Boat?
You need lightweight wood or plastic, waterproof glue, paint, and a small sail or motor. Basic tools include scissors, sandpaper, and a ruler. These materials ensure your toy boat floats and looks attractive.
How Long Does It Take To Make A Diy Toy Boat?
Making a simple DIY toy boat usually takes 30 to 60 minutes. Drying time for glue or paint may add extra time. Overall, it’s a quick and fun craft project suitable for all ages.
Can Kids Safely Make A Diy Toy Boat?
Yes, kids can safely make a DIY toy boat with adult supervision. Use child-friendly tools and non-toxic materials. The project helps develop creativity and fine motor skills, making it an educational activity.
How Do I Make My Diy Toy Boat Waterproof?
Apply waterproof paint or sealant to the boat’s surface. Use waterproof glue to assemble parts tightly. These steps protect the boat from water damage and improve its floating ability.
Conclusion
Making a DIY toy boat is fun and simple. You only need a few materials to start. This project helps you learn and enjoy at the same time. You can decorate your boat any way you like. Testing it in water is the best part.
Try different designs and see which floats best. Sharing this activity with friends or family makes it even better. Keep practicing, and your boats will look amazing. Enjoy the process and have fun with your homemade toy boat!


