Have you ever wanted to create your very own remote control toy car? Imagine the thrill of driving a car you built with your own hands, controlling it from a distance.
It’s not as hard as you might think, and you don’t need to be an expert to get started. In this guide, you’ll discover simple steps that turn your ideas into a fun, working remote control car. Ready to impress your friends and enjoy hours of entertainment?
Keep reading, and let’s build something amazing together!
Materials Needed
Before diving into building your remote control toy car, gathering the right materials is crucial. The quality and compatibility of these parts will directly affect how well your car performs and how smoothly the building process goes. Let’s break down what you need to get started.
Choosing The Car Body
The car body is the foundation of your project. You can choose between ready-made plastic shells or custom build one using lightweight materials like balsa wood or acrylic sheets. Consider the size and shape—smaller bodies are easier to maneuver but might limit your motor options.
Think about durability too. I once picked a thin plastic body that cracked easily during testing. If you want a longer-lasting toy, opt for sturdier materials like ABS plastic or a metal frame.
Selecting The Remote Control System
Your remote control system is the brain of the operation. Look for a transmitter and receiver combo that matches your skill level—basic models are perfect for beginners, while advanced kits offer more control features. Frequency matters; 2.4 GHz systems usually provide better range and less interference compared to older 27 MHz sets.
Also, check battery requirements and compatibility with your car’s motor. Have you thought about whether you want a wired or wireless setup? Wireless is more common and gives your car freedom to move, but wired systems can be simpler to troubleshoot.
Gathering Tools And Components
Besides the car body and remote system, you’ll need a variety of tools and components to assemble everything. Essential tools include a small screwdriver set, soldering iron, wire cutters, and glue. You’ll also need electronic parts like a motor, batteries, wires, and wheels.
Don’t forget screws, nuts, and possibly some gears or pulleys depending on your car design. I once underestimated the number of screws needed and had to make an extra trip to the hardware store. Planning ahead saves time and frustration.

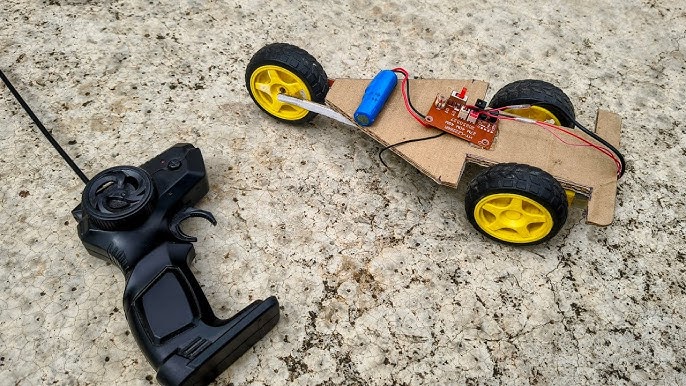
Credit: www.youtube.com
Preparing The Car Body
Preparing the car body is an important step in building a remote control toy car. A clean and well-modified frame ensures smooth assembly and better performance. This phase involves cleaning the frame and fitting the wheels and axles correctly. Taking time here helps avoid problems later.
Cleaning And Modifying The Frame
Start by removing any dust, dirt, or grease from the car frame. Use a soft cloth and mild cleaner for this task. Check the frame for any rough edges or parts that need trimming. Sand down sharp areas gently to prevent damage to other parts.
Modify the frame to fit the motor and battery if needed. Create small holes or slots carefully to mount components securely. Make sure the frame stays strong and balanced during these changes.
Mounting Wheels And Axles
Choose wheels that fit your car frame well. Align the axles with the designated slots or holes on the frame. Insert the axles smoothly without forcing them.
Check that wheels spin freely and do not rub against the frame. Use spacers or washers to prevent friction if needed. Secure the wheels using nuts or clips, making sure they stay tight but still rotate easily.
Assembling The Motor And Electronics
Assembling the motor and electronics is a key part of building your remote control toy car. This stage brings the car to life by adding movement and control. Careful work here ensures the car runs smoothly and responds well to commands.
Installing The Motor
Choose a motor that fits your car’s size and speed needs. Secure the motor in the designated motor mount or frame slot. Use screws or clips to hold it firmly in place. Make sure the motor shaft aligns with the wheels or gears. This alignment helps power transfer without slipping or noise.
Wiring The Circuit
Connect wires from the motor terminals to the control board or receiver. Use insulated wires to avoid short circuits. Keep the wires neat and avoid crossing them unnecessarily. Solder the connections or use secure connectors for stable contact. Double-check the wiring layout to match your control system’s diagram.
Connecting The Battery Pack
Pick a battery pack that matches the motor voltage and control system. Attach the battery pack wires to the circuit power input. Observe correct polarity: red wire to positive, black wire to negative. Fix the battery pack in a safe, accessible spot on the car’s chassis. Test the power flow by turning on the remote control and watching the motor respond.

Credit: www.youtube.com
Setting Up The Remote Control
Connect the remote control to the toy car’s receiver carefully. Ensure batteries are inserted correctly for smooth operation. Test the remote to confirm it controls the car’s movements properly.
Setting up the remote control for your toy car can be the most thrilling part of your DIY project. It’s when your creation finally comes to life. But how do you ensure that your remote control is perfectly in sync with your car? Let’s dive into the steps to make it happen.Pairing The Transmitter And Receiver
To start, you’ll need to pair the transmitter (the remote) with the receiver (the component inside the toy car). This connection is crucial for your car to respond to your commands. Begin by ensuring both devices are powered on. Look for a tiny button on the receiver. Press it until a light starts blinking—this signals it’s ready to pair. Now, on the transmitter, press the corresponding button, usually labeled “bind” or “pair”. The blinking light should turn solid, indicating a successful connection. I remember the first time I did this, I felt a surge of excitement when the lights aligned. It was like watching a silent conversation between two devices. Have you ever had a moment where technology just clicked?Testing Signal Range
After pairing, it’s essential to test the signal range. This step ensures your toy car responds even from a distance. Take your remote and move a few feet away from the car. Gradually increase the distance while operating the car’s functions. Note how far you can go before the car stops responding. I once underestimated my car’s range and was thrilled to find it still worked halfway down the street! It’s all about finding that sweet spot where control and freedom meet. How far can your creation go? By following these steps, you ensure that your remote control setup is solid, enabling seamless interaction with your toy car. Now, it’s time to enjoy the fruits of your labor and see where your creativity takes you!Integrating Controls With The Car
Integrating controls with your remote control toy car is where the project truly comes to life. This step connects your mechanical parts with the electronic commands you send from the controller. Getting this right means your car will respond smoothly and accurately to your inputs, making the driving experience fun and reliable.
Linking Steering Mechanism
Start by attaching the servo motor to the steering system. The servo motor acts like your hand on the wheel, turning the front wheels left or right based on signals it receives. Secure the servo arm to the steering linkage with screws or clips, making sure it moves freely without binding.
Check the alignment carefully. Your wheels should center perfectly when the servo is at its neutral position. If they don’t, adjust the linkage length or the servo arm angle until the wheels point straight ahead. This precision prevents uneven tire wear and improves control.
Have you noticed how small misalignments in your car’s steering can cause big handling problems? Spending extra time here will save frustration later and make your car feel more responsive on the track.
Programming Movement Functions
Once your steering is linked, it’s time to program how your car moves. Use a microcontroller like an Arduino or a simple remote control receiver to interpret your commands. Write code that maps the joystick or button inputs to motor speeds and steering angles.
Keep your code organized and comment each function clearly. For example, define separate functions for accelerating, braking, and turning. This makes it easier to tweak behavior and add features later on.
Test each movement function individually. Does the car accelerate smoothly? Does it stop quickly when you release the throttle? Adjust your motor control signals or add delays as needed to get natural, responsive motion.
What happens if your car spins out when turning fast? Try lowering the steering sensitivity in your program to prevent oversteering. Small code tweaks can make a big difference in how your car handles.
Final Adjustments And Testing
After assembling your remote control toy car, it is time for the final adjustments and testing. This stage ensures the car runs smoothly and responds well to the remote. Careful calibration and troubleshooting help improve performance and extend playtime fun.
Calibrating Speed And Direction
Start by checking the car’s speed settings. Adjust the motor controller to match your preferred speed. Use the remote to test forward, backward, left, and right movements. Make small tweaks to improve steering accuracy and speed balance.
Ensure the wheels turn freely and align properly. Tighten or loosen screws as needed. Confirm the car moves straight without drifting.
Troubleshooting Common Issues
Common problems include unresponsive controls or uneven movement. Check battery levels first. Weak batteries cause slow or erratic behavior. Inspect all wiring for loose connections or damage.
If the car does not respond, reset the remote and receiver. Confirm they are paired correctly. Listen for unusual sounds from the motor that may indicate a jam or misalignment.
- Check for debris caught in wheels or gears
- Ensure the antenna on the receiver is intact
- Replace faulty parts if necessary
Testing in an open space helps identify issues quickly. Make adjustments step-by-step for best results.
Tips For Customization
Customizing your remote control toy car adds a personal touch that makes the project truly yours. It’s not just about how it moves, but how it looks and sounds that can make your creation stand out. Let’s dive into some practical tips that will help you bring personality and flair to your toy car.
Adding Lights And Sounds
Adding lights and sounds can make your toy car feel more alive and exciting. You might want to install LED lights for headlights or taillights. These small additions can be powered using the same battery that runs your motor.
Consider using a small buzzer or speaker to add engine sounds or horn effects. You can find simple sound modules online that are easy to connect to your car’s remote control system. Think about how these sounds might react when you press certain buttons—will the horn beep or the engine roar?
Wiring the lights and sounds doesn’t have to be complicated. Keep wires organized and secure to avoid interference with moving parts. Have you thought about how to make these features durable so they survive every race?
Painting And Decorating
Painting your toy car is a fun way to show your creativity and make it visually unique. Use spray paint or acrylics designed for plastic or metal, depending on your car’s material. Multiple thin coats work better than one thick coat and help avoid drips.
Adding decals or stickers can enhance your design without much effort. You could create your own decals using printable vinyl or buy pre-made ones featuring racing stripes or logos. What colors and patterns represent your style best?
Don’t forget about protecting your paint job. Apply a clear coat to seal your design and prevent scratches during play. This simple step makes your artwork last longer and keeps your toy car looking fresh.

Credit: www.youtube.com
Frequently Asked Questions
What Materials Are Needed To Build A Remote Control Toy Car?
You need a chassis, wheels, motor, remote control system, battery, and wires. Additional items include screws, soldering tools, and a screwdriver for assembly.
How Do You Connect The Motor To The Remote Control?
Connect the motor terminals to the motor driver. The driver links to the remote control receiver, allowing remote operation.
Can Beginners Build A Remote Control Toy Car Easily?
Yes, beginners can build one with basic tools and clear instructions. Start with simple kits and gradually advance skills.
What Type Of Battery Is Best For A Remote Control Toy Car?
Rechargeable lithium-ion batteries are best. They provide longer run time, are lightweight, and recharge quickly for repeated use.
Conclusion
Building a remote control toy car can be fun and rewarding. You get to learn about parts and how they work together. Each step is simple and clear. Take your time and enjoy the process. Testing your car brings a sense of pride.
Keep practicing to improve your skills. This project is great for beginners and hobbyists alike. Give it a try and see what you create!