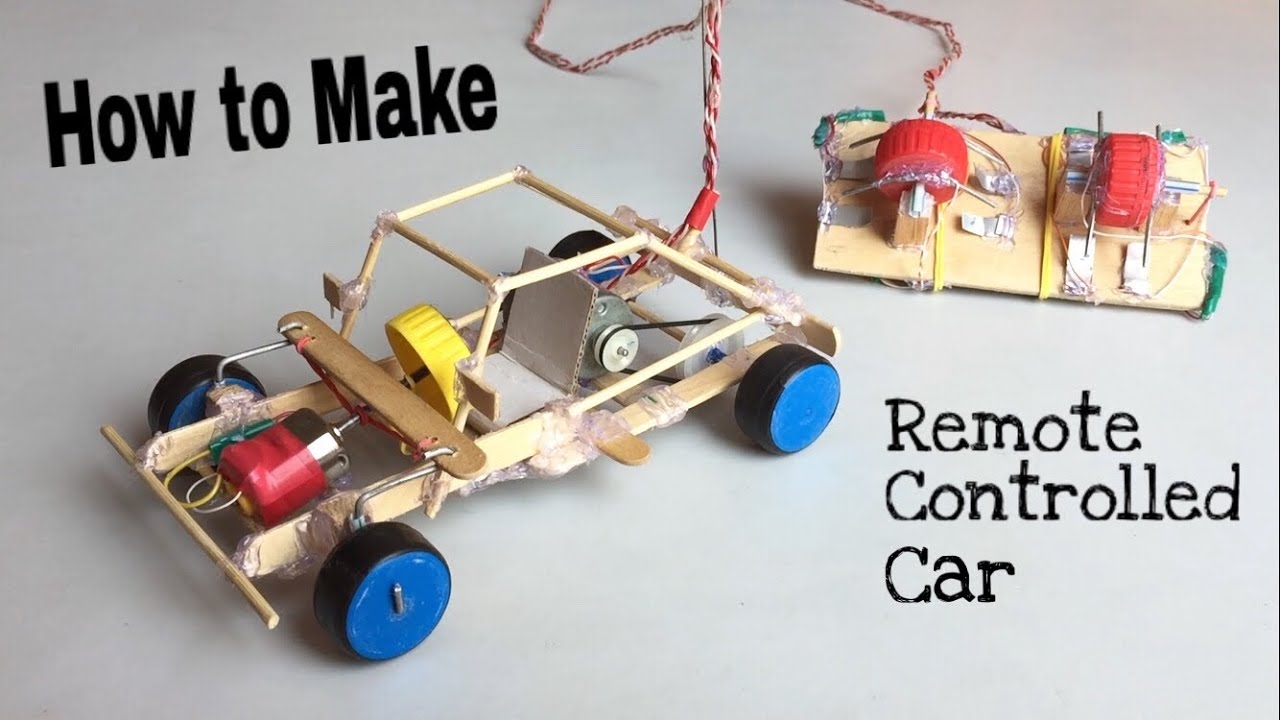
Have you ever wondered how you can build your very own remote control toy car? Imagine controlling a car you made with your own hands, zooming it around the room, and impressing your friends.
It’s easier than you think, and you don’t need to be an expert. In this guide, you’ll discover simple steps and tips that make creating a remote control toy car fun and rewarding. Ready to turn your ideas into action?
Let’s dive in and start building!

Credit: www.youtube.com
Materials Needed
Gathering the right materials is crucial before you start building your remote control toy car. Having everything on hand will save you time and frustration. Let’s break down what you need into two main categories: basic components and tools.
Basic Components
Your remote control toy car needs a few key parts to function properly. Here’s a list of essential components you should have ready:
- Chassis:This is the frame of your car. You can use a plastic or metal base, or even repurpose an old toy car chassis.
- Electric Motor:A small DC motor powers the wheels. Choose one that matches the size and weight of your car.
- Wheels and Axles:Four wheels with matching axles are necessary for movement. You can find these in hobby stores or salvage them from old toys.
- Battery Pack:Provides power to the motor and remote receiver. Common options include AA batteries or rechargeable Li-ion packs.
- Remote Control System:This includes a transmitter (your remote) and a receiver that connects to the motor. Look for simple RF or Bluetooth modules depending on your skill level.
- Wires and Connectors:You’ll need these to connect the motor, battery, and receiver securely.
- Switch:Optional but useful to turn the car on and off without removing batteries.
Do you have a favorite hobby store nearby? It’s a great place to find unique parts that can make your car stand out.
Tools Required
Having the right tools makes assembling your remote control car easier and safer. Here’s a basic toolkit that will get you through the build:
- Screwdrivers:Both Phillips and flat-head for securing components.
- Soldering Iron:Needed to connect wires firmly, especially for the motor and receiver.
- Wire Strippers:To strip insulation off wires without damaging the metal inside.
- Hot Glue Gun:Helps to fix parts in place quickly and provides insulation.
- Multimeter:Useful for testing electrical connections and ensuring your circuit works.
- Small Pliers:Handy for bending wires and holding tiny parts steady.
- Scissors or Hobby Knife:For cutting wires, tape, or trimming parts.
Have you ever tried soldering before? It might seem tricky at first, but it’s a skill that will make your project much more reliable.
Choosing The Right Car Body
Choosing the right car body is key to building a remote control toy car. The body affects the car’s weight, balance, and look. It also influences how well the car moves and handles. Picking a sturdy, lightweight body helps the car run smoothly. The design should fit your motor and battery size. Good ventilation helps keep parts cool during use. You can reuse old toy cars or build a custom body from scratch. Both choices offer different benefits for your project.
Using Old Toy Cars
Old toy cars make great bodies for remote control cars. They already have a shape and wheels. This saves time on building and designing. You can remove the old parts inside and add new motor and controls. Plastic toy cars are light and easy to work with. Metal bodies are tougher but heavier. Check for cracks or damage before starting. Sand the surface to help paint or glue stick better. Cutting tools can shape the body to fit electronics. Old cars give a ready base to customize.
Building From Scratch
Building a car body from scratch lets you create a perfect fit. Use materials like plastic sheets, wood, or lightweight metal. Plastic is easy to cut and shape. Wood is strong but may add weight. Metal is durable but needs special tools. Start with a simple frame to hold parts. Add panels for the outer body and paint for style. Use glue or screws to hold pieces together. Designing your own body allows full control over size and shape. This method takes more time but offers more freedom.
Assembling The Chassis
Assembling the chassis is a critical part of building your remote control toy car. This stage forms the foundation that holds all other components together. A sturdy and well-built chassis ensures your car runs smoothly and lasts longer on the track.
Mounting The Motors
Start by securing the motors to the chassis using screws or motor mounts designed for your model. Make sure the motors are aligned properly so the gears mesh smoothly with the wheels. Loose or misaligned motors can cause jerky movements or even damage.
Check the motor rotation before tightening everything. Power the motors briefly to confirm they spin in the right direction. If they don’t, swapping the wires usually fixes the issue quickly.
Attaching Wheels
Next, attach the wheels to the motor shafts or axles. Wheels should fit snugly without wobbling. If you notice any looseness, add washers or small spacers to secure them better.
Test the wheel movement by spinning them by hand. Are they turning freely without resistance? If not, adjust the positioning or check for obstructions. Your car’s speed and control depend heavily on how well the wheels are attached.

Credit: www.youtube.com
Wiring The Electronics
Connect the motor, battery, and receiver carefully to ensure the car moves smoothly. Use wires to link each electronic part securely for reliable control. Double-check connections to avoid short circuits and ensure proper functioning.
Wiring the electronics of your remote control toy car can be an exhilarating part of the build. It’s the stage where your car transforms from a mere assembly of parts into a responsive, dynamic machine. As you navigate through this process, you’ll find a delightful mix of creativity and technical challenge.Connecting The Motor Driver
The motor driver is the heart of your toy car’s propulsion system. Begin by identifying the input and output terminals on the motor driver board. Securely connect the input terminals to your microcontroller, ensuring that the signal wires are intact and properly aligned. Use jumper wires to bridge the output terminals to the motors. This step is crucial for translating digital signals into motor movement. Make sure the connections are firm; loose wires can lead to erratic behavior and power loss.Setting Up The Battery Pack
A well-organized battery pack ensures your toy car has the stamina to zoom around with vigor. Choose a battery pack that matches the voltage requirements of your motor driver and microcontroller. Double-check the polarity before connecting the batteries; reversing them can damage your components. Secure the battery pack in a position that balances the car, preventing it from tipping over during fast turns. Consider using Velcro strips for easy removal and replacement. Have you thought about the impact of weight distribution on your car’s performance? Proper alignment can enhance speed and agility. By paying attention to these wiring details, you’re not just building a toy—you’re crafting an experience. How will you push the limits of your creation?Setting Up The Remote Control
Setting up the remote control is a key part of building your remote control toy car. This process makes sure the car moves exactly as you want. Proper setup helps avoid delays or wrong movements. Understanding the controller and receiver connection is important. Follow simple steps to prepare your remote control for smooth operation.
Selecting A Controller
Choose a controller that fits your toy car. Look for one with easy buttons and clear signals. Controllers can be wired or wireless. Wireless controllers offer more freedom and range. Check the controller’s frequency to match the receiver. Common frequencies are 27 MHz, 49 MHz, and 2.4 GHz. Pick a controller with good battery life. Also, ensure the size fits your hand comfortably. Simple controls help beginners learn fast.
Pairing With Receiver
Pairing the controller with the receiver links the two devices. This step allows the car to respond to your commands. Start by powering on both controller and receiver. Keep them close during pairing to avoid signal loss. Some receivers have a bind button to connect with the controller. Press it and then press the controller’s bind button. Wait for the lights to stop blinking. This shows a successful connection. Test the controls to confirm the car moves correctly. If not, repeat the pairing process carefully.
Testing And Troubleshooting
Testing and troubleshooting are key parts of building a remote control toy car. These steps help confirm the car works well. They also fix problems before the car is fully used. Careful checking ensures smooth operation and longer life for your toy car.
Checking Motor Functions
Start by checking the motor’s response. Connect the motor to the power source briefly. Watch if the motor spins smoothly without noise or hesitation. Listen for any unusual sounds like grinding or clicking.
Use a multimeter to test the motor’s electrical connections. Check for proper voltage reaching the motor terminals. Make sure wires are tight and not damaged. Loose wires can cause the motor to stop or work weakly.
Test the motor’s rotation direction with the remote control signals. Forward and backward movements should match your commands. If the motor moves incorrectly, verify the wiring and remote control settings.
Fixing Common Issues
Identify common problems by observing the car’s behavior. The car might not move, move slowly, or not respond to controls. Check the battery charge first. Low battery power often causes weak motor performance.
- Reattach loose wires and connectors securely.
- Replace damaged wires or parts promptly.
- Clean the motor and gears to remove dust or debris.
- Adjust the remote control frequency if there is interference.
- Reset the remote control and receiver to sync them again.
Test the car after each fix to see if the problem is solved. Repeat the checks if needed. Careful troubleshooting helps ensure your remote control toy car runs perfectly.
Customizing Your Toy Car
Customizing your remote control toy car makes it truly yours. It adds personality and style. Small changes can make a big difference in how your car looks and works. Personal touches create a fun and unique driving experience. Start with simple ideas and build up as you go.
Painting And Decorating
Painting your toy car gives it a fresh new look. Use spray paint or acrylics made for plastic. Choose colors that you like or that match a theme. Use painter’s tape to cover parts you don’t want to paint. Let each layer dry before adding another coat.
Decorate with stickers or decals for extra flair. You can also use markers to draw designs. Make sure the paint and decorations are dry before using the car. Protect your work with a clear sealant spray. This keeps the paint from chipping during play.
Adding Extra Features
Extra features improve how your car performs and looks. Add LED lights to the front or under the car for a cool effect. Small motors can power moving parts like doors or spoilers. Attach better wheels or tires for smoother rides on different surfaces.
Consider installing a small camera for a first-person view while driving. Use foam or rubber bumpers to protect your car from crashes. Customize the antenna for better signal and control range. Each feature adds fun and enhances your remote control experience.

Credit: www.youtube.com
Frequently Asked Questions
What Materials Are Needed To Make A Remote Control Toy Car?
You need a small car chassis, motors, batteries, a remote control system, wheels, and connecting wires. Basic tools like a soldering iron and screwdriver help with assembly.
How Do I Assemble The Remote Control Car Parts?
Attach the motors to the chassis, connect them to the battery and receiver, then fix the wheels. Ensure wires are connected correctly for smooth control.
Can Beginners Build A Remote Control Toy Car?
Yes, beginners can build one using simple kits and step-by-step instructions. Start with basic models and gradually explore advanced components.
How Does The Remote Control System Work In Toy Cars?
The remote sends radio signals to the car’s receiver, which controls the motors. This wireless connection allows you to steer and move the car remotely.
Conclusion
Building a remote control toy car can be fun and simple. You only need basic parts and a little patience. Follow each step carefully to avoid mistakes. Testing the car often helps find problems early. Enjoy learning how electronics and mechanics work together.
This project can improve your skills and creativity. Keep practicing to make better and faster cars. Share your experience with friends or family. Making your own toy car brings a sense of pride. Try new ideas to make it unique and exciting.