Have you ever wanted to build your very own wireless remote control toy? Imagine the excitement of controlling a car, plane, or robot you made yourself—right from your fingertips.
It’s easier than you think, and you don’t need to be an expert to get started. In this guide, you’ll discover simple steps and tips that make creating your own wireless remote control toy fun and rewarding. Ready to impress your friends and unlock your creativity?
Let’s dive in!
Tools And Materials Needed
Gathering the right tools and materials sets the foundation for making wireless remote control toys. These items help build a toy that works smoothly and lasts long. Focus on parts that are easy to use and fit your project size. Prepare everything before you start the assembly. This approach saves time and avoids interruptions.
Essential Components
- Microcontroller (like Arduino or Raspberry Pi)
- Wireless module (Bluetooth or RF transmitter and receiver)
- Motors (servo or DC motors for movement)
- Battery pack (suitable voltage and capacity)
- Motor driver (to control the motors safely)
- Chassis or frame (base to mount parts)
- Wheels or propellers (for mobility)
- Switches and buttons (for manual control)
- Wires and connectors (to link all components)
- Soldering iron and solder (for secure electrical connections)
Optional Accessories
- LED lights (for visual effects)
- Buzzer or speaker (for sound feedback)
- Speed controller (to adjust motor speed)
- Sensors (like ultrasonic or infrared for obstacle detection)
- Enclosure or casing (to protect electronics)
- Rechargeable battery and charging circuit
- Heat shrink tubing (for wire insulation)
- Remote control handset (pre-made for easy use)

Credit: www.youtube.com
Basic Electronics For Remote Toys
Getting a grip on the basic electronics behind wireless remote control toys is essential before you start building one. Understanding how the parts work together lets you troubleshoot problems and make smart improvements. You don’t need to be an expert; just knowing the core concepts can boost your confidence and success.
Understanding Circuits
Every remote control toy relies on circuits to function. Think of a circuit as a path that allows electricity to flow from the power source to the motors or lights. Without a complete circuit, your toy won’t move or respond.
Circuits include components like resistors, capacitors, and switches. Each part has a specific job: resistors control the flow of electricity, capacitors store energy, and switches open or close the circuit. When you wire these correctly, you create a reliable system that powers your toy.
Have you ever noticed a toy that only works sporadically? Most likely, it’s due to a loose or broken circuit. Learning to read simple circuit diagrams can help you avoid these headaches and keep your toy running smoothly.
Using Transmitters And Receivers
Transmitters and receivers are the heart of wireless control. The transmitter sends signals through the air, while the receiver on the toy picks them up and converts them back into actions.
These devices operate on radio frequencies, usually around 27MHz or 2.4GHz. Choosing the right frequency matters because some frequencies face less interference, improving your toy’s responsiveness.
Wiring a transmitter involves connecting it to your control buttons, and the receiver needs to connect to your toy’s motor and power supply. Testing the signal strength and range before final assembly can save you time and frustration.
Have you tried using different types of antennas? Even a small change can affect how far your remote controls your toy. Experimenting here can make your setup more fun and reliable.
Designing Your Toy
Designing your wireless remote control toy is where creativity meets functionality. This stage shapes how your toy will look, move, and respond to commands. Focusing on the right design choices ensures your toy is not only fun but also reliable and easy to use.
Choosing The Toy Type
Start by deciding what kind of toy you want to create. Do you imagine a car, a drone, a robot, or something more unique? Each type has different design needs and challenges.
Consider the size and weight of your toy. Smaller toys need lighter components, while larger ones can handle heavier parts but require more power. Think about the environment where your toy will be used—is it indoors, outdoors, or both?
Ask yourself what will make your toy stand out. Will it have special features like lights, sounds, or sensors? These choices influence the design and the complexity of the electronics inside.
Planning The Control Mechanism
Your toy’s control system is the heart of its wireless functionality. Decide whether you want to use radio frequency (RF), infrared (IR), Bluetooth, or Wi-Fi. Each has its pros and cons depending on range, cost, and ease of setup.
Think about how you want users to interact with the toy. Will it have a traditional handheld remote, a smartphone app, or voice control? Simpler controls may attract younger users, while advanced options can appeal to tech enthusiasts.
Map out the commands your toy will respond to. Basic movements like forward, backward, left, and right are common, but what about additional actions like speed control or special tricks? Planning this early helps avoid complications later.

Credit: m.youtube.com
Assembling The Remote Control
Begin by connecting the battery and circuit board inside the remote casing. Attach buttons and wires carefully to ensure proper signal transmission. Test the remote to confirm it controls the toy wirelessly and smoothly.
Assembling the remote control for your wireless toy is a fascinating journey into the world of electronics and creativity. It’s the part where your vision begins to come alive, and you can almost feel the excitement of controlling your creation from a distance. Whether you’re a seasoned electronics hobbyist or a curious beginner, assembling the remote control is an achievable challenge that promises immense satisfaction.Wiring The Buttons
The buttons are your main interface with the toy. Start by selecting a suitable PCB (Printed Circuit Board) to mount your buttons. Soldering is key here, ensuring each button is securely connected to the designated circuit pathways. Make sure each button has a clear function, like moving left or accelerating forward. Double-check connections to avoid any short circuits. A loose wire can cause erratic behavior, which can be both amusing and frustrating.Integrating The Transmitter
The transmitter is the heart of your remote control. It sends signals to your toy, dictating its actions. Choose a transmitter module that’s compatible with your toy’s receiver for seamless communication. Attach the transmitter to your PCB and connect it to the power source. Test the transmitter’s range by walking around with the remote, ensuring it communicates effectively with the toy even from a distance. Are there any obstacles in your space that might affect the signal? Consider testing in different environments to ensure consistent performance.Building The Toy Unit
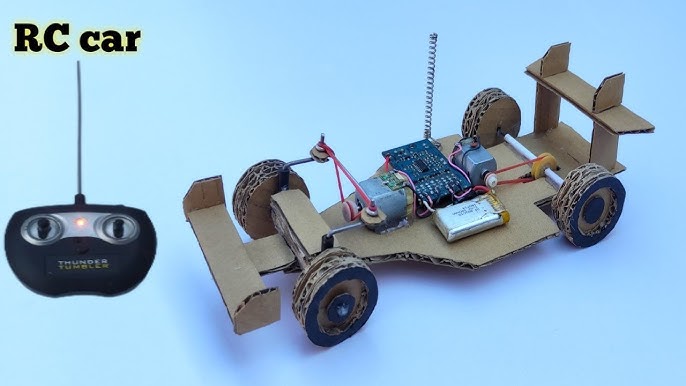
Building the toy unit is where your wireless remote control toy starts to come alive. This phase involves carefully assembling the electronic components that respond to your remote commands. Getting the connections right here is crucial for smooth operation and reliable control of your toy.
Installing The Receiver
The receiver is the heart of your toy’s wireless system. It picks up signals from the remote and sends instructions to the motors or other parts.
Begin by securely mounting the receiver on the toy’s chassis where it won’t get damaged or disconnected during play. Choose a location with good signal exposure—avoiding metal parts that can block transmission.
Next, connect the receiver’s output pins to the control board or directly to the motor driver, depending on your design. Make sure each connection matches the wiring diagram to prevent short circuits.
Have you checked the receiver’s voltage requirements? Supplying the wrong voltage can fry the circuit or cause erratic behavior.
Connecting Motors And Power
Motors give your toy movement, so connecting them properly to the power source and control system is essential.
Identify the positive and negative terminals on both the motors and your power supply. Connect wires firmly using solder or reliable connectors to ensure a stable current flow.
Consider adding a switch or fuse between the power supply and motors to protect against overload or accidental shorts.
Think about the motor type you’re using—DC motors are common and easy to control, but make sure your power supply matches their voltage and current ratings.
Remember, a loose wire can cause the toy to stop working unexpectedly. Double-check all connections before testing your unit.

Credit: www.youtube.com
Testing And Troubleshooting
Testing and troubleshooting your wireless remote control toys is a crucial phase that ensures everything works smoothly before you start enjoying the fun. It helps catch any glitches early, saving time and frustration later. Let’s dive into practical ways to check your toy’s performance and fix common problems effectively.
Checking Signal Range
Start by testing the distance your remote control can operate from the toy. Walk backward slowly while controlling the toy, and note the maximum distance it responds without delay or signal loss.
If you notice the toy stops responding too soon, try moving away from potential signal blockers like walls, metal objects, or other electronics. These can interfere with your toy’s signal.
Have you tried changing the battery positions or replacing them with fresh ones? Weak batteries often reduce signal strength, even if the toy looks fine at first glance.
Fixing Common Issues
Sometimes your wireless remote control toy might not respond or behave erratically. Check the basic connections first—loose wires or poor solder joints can cause communication problems.
Resetting the toy and remote by turning them off and on again often resolves minor glitches. If this doesn’t help, inspect the antenna for any damage or misalignment.
Here’s a quick checklist to troubleshoot effectively:
- Verify batteries in both remote and toy are fully charged and correctly installed.
- Ensure the remote and toy are on the same frequency or channel.
- Look for any visible damage on circuits or connectors.
- Try controlling the toy in a different environment to rule out interference.
Have you experienced any unique issues that others might overlook? Sharing those small details can lead to unexpected solutions.
Customizing Your Remote Toy
Customizing your wireless remote control toy can transform a simple plaything into a unique gadget tailored to your preferences. It’s not just about making it look different but enhancing its capabilities and performance. This section focuses on practical ways to add new features and boost how your toy operates.
Adding Features
Think about what new abilities you want your toy to have. You can add LED lights to make it glow during night play or install a small speaker for sound effects. Adding a camera module is another exciting option if you want to see from the toy’s perspective.
Use simple components like switches, sensors, or buttons to control these features. For example, a motion sensor can trigger lights or sounds when the toy moves. Wiring these parts to the toy’s main circuit board requires basic soldering skills, but the impact on playtime is huge.
Have you ever wished your toy could do more tricks or respond to your commands differently? Adding programmable microcontrollers like Arduino can give you that control. You can create custom programs that change how the toy reacts, making it truly yours.
Improving Performance
Performance improvements can make your toy faster, stronger, or more responsive. Start by upgrading the motors or batteries. Higher quality motors provide smoother movement, and rechargeable lithium batteries offer longer playtime.
Check the toy’s wheels and gears for wear and tear. Replacing plastic gears with metal ones can enhance durability and reduce noise. Lubricating moving parts also keeps everything running smoothly.
Have you noticed any lag or delay in your toy’s response? Improving the wireless signal by using a better antenna or switching to a different frequency band can solve this. This tweak reduces interference and keeps control precise even from a distance.
Frequently Asked Questions
What Materials Are Needed For Wireless Remote Control Toys?
You need a microcontroller, RF module, motors, battery, and chassis. Additional tools include soldering iron and wires. These parts work together to enable remote control and movement.
How Do Wireless Signals Control Toy Movements?
Wireless signals from the remote are received by the toy’s receiver module. The microcontroller processes these signals and activates motors accordingly. This allows precise control over the toy’s actions remotely.
Can Beginners Build Wireless Remote Control Toys?
Yes, beginners can build simple toys using kits or tutorials. Starting with basic components helps understand the fundamentals. Gradually, you can advance to more complex designs and programming.
What Programming Languages Are Used For Toy Controllers?
Common languages include C, C++, and Arduino IDE’s simplified code. These are easy to learn and widely supported for microcontroller programming. They enable precise control of toy functions.
Conclusion
Making wireless remote control toys can be fun and rewarding. You only need some basic parts and simple steps. Follow the guide carefully to build your own toy. Testing the controls helps ensure everything works well. Enjoy playing with the toy you created yourself.
Keep practicing to improve your skills over time. This project teaches useful electronics and coding basics. Try making different designs for variety and fun. Building toys like these sparks creativity and learning. Start today and see how much you can create!