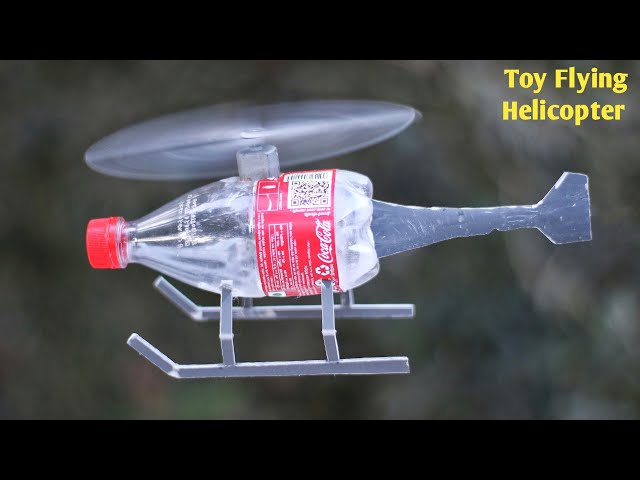
Have you ever wanted to create a fun toy for your kids or even for yourself using something simple and easy to find? Making a DIY plastic bottle toy helicopter is not only a great way to recycle but also a fantastic hands-on project that anyone can try.
Imagine turning an empty bottle into a spinning, flying toy that sparks joy and creativity. In this guide, you’ll discover step-by-step how to build your own helicopter with materials you probably already have at home. Ready to bring your creativity to life and impress your friends or family?
Let’s get started!
Materials Needed
Gathering the right materials makes the DIY plastic bottle toy helicopter fun and easy. Using common household items helps keep the project simple and affordable. This section lists all the materials needed for a smooth crafting experience.
Plastic Bottles
- Empty plastic bottles with a smooth surface
- Small bottles for the helicopter body
- Flat bottles or cut plastic for rotor blades
- Clear or colored bottles for decoration
Cutting Tools
- Sharp scissors for precise cuts
- Utility knife for detailed shaping
- Cutting mat to protect surfaces
- Safety gloves to avoid injuries
Adhesives And Fasteners
- Strong glue suitable for plastic
- Hot glue gun for quick bonding
- Small screws or pins for secure parts
- Tape for temporary fixes
Decorative Items
- Markers or paint for colors
- Stickers for fun designs
- Colored paper for extra features
- Googly eyes or small buttons

Credit: www.youtube.com
Preparing The Bottle
Preparing the plastic bottle is an important first step for making a DIY toy helicopter. This stage ensures the bottle is clean, safe, and ready for crafting. Proper preparation makes cutting easier and improves the final look of the toy. Follow simple steps to get the bottle ready.
Cleaning And Drying
Start by rinsing the bottle with warm water. Use a small amount of dish soap to remove dirt and residue. Shake the bottle well to clean inside surfaces. Rinse thoroughly to remove all soap traces. Let the bottle dry completely before moving on. Drying prevents slipping and helps with accurate cutting.
Marking Cut Lines
Use a marker or pen to draw the shapes you want to cut. Mark the bottle carefully, following the toy design. Keep lines clear and visible for easy cutting. Measure parts like the rotor blades and body sections. Double-check the markings to avoid mistakes. Clear lines guide safe, precise cuts for the helicopter parts.
Cutting The Parts
Cutting the parts is a crucial stage in making your DIY plastic bottle toy helicopter. Precise cutting ensures all pieces fit well and the toy works smoothly. Use sharp scissors or a craft knife for clean edges.
Take your time and follow the shapes carefully. Mark the bottle with a marker before cutting. This helps avoid mistakes and saves material. Safety comes first, so handle sharp tools with care.
Creating The Body
Start by cutting the main part of the bottle for the helicopter’s body. Choose the middle section of the bottle, where it is sturdy and even. Cut a rectangular piece about 4 to 5 inches long.
Make sure the edges are smooth to avoid sharp points. This section will hold all other parts together.
Making The Rotor Blades
Cut out four long, narrow strips from the bottle’s flat areas. Each strip should be about 3 to 4 inches long and 0.5 inches wide. These will form the helicopter’s rotor blades.
Round off the ends of each blade for a realistic look. Keep blades even in size for balance and better spinning.
Shaping The Tail
Use the bottle’s neck or a slim piece for the tail. Cut a narrow strip about 5 inches long. Taper the end slightly for an aerodynamic shape.
The tail helps stabilize the helicopter and adds to its overall look. Smooth any rough edges before attaching.

Credit: www.youtube.com
Assembling The Helicopter
Gather plastic bottle parts carefully to fit together like a real helicopter. Attach the rotor blades securely to ensure smooth spinning. Balance each piece well for a sturdy, fun toy helicopter.
Assembling the Helicopter You’ve gathered your materials and are ready to transform that plastic bottle into a fun toy helicopter. Now, it’s time to assemble the helicopter and make all the parts come together seamlessly. This is where the magic happens, and with a little patience, you’ll see your creation take flight—figuratively, of course. Let’s dive into the key steps to bring your DIY project to life.Attaching The Rotor Blades
The rotor blades are crucial for giving your helicopter that authentic look. Start by cutting four equal strips from a sturdy plastic, such as a discarded bottle cap. These will serve as your blades. Next, use a strong adhesive or a hot glue gun to attach the blades to a small plastic cap, which will act as the rotor hub. Ensure the blades are evenly spaced for a balanced appearance. Allow the glue to set completely before moving on.Fixing The Tail Section
The tail section adds to the helicopter’s sleek design. Use a thin strip of plastic to craft the tail rotor. Cut another strip for the tail boom, ensuring it’s proportional to the body. Attach the tail rotor to the end of the boom with glue, and connect the entire assembly to the rear of the bottle. Double-check that it’s aligned properly, as a crooked tail can spoil the look.Securing The Body Components
Now it’s time to secure the body components. Cut a section from the bottle to form the cockpit. Attach it to the front, using glue for a stable fit. To enhance the design, consider painting the body or adding decals. This is a great way to personalize your helicopter and make it uniquely yours. Once every component is in place, step back and admire your creation. Does it look like a helicopter you’d be proud to show off? Adjust and tweak as necessary to achieve the perfect finish.Adding Finishing Touches
Adding finishing touches to your DIY plastic bottle toy helicopter is where creativity really shines. This stage transforms a simple craft into a vibrant, eye-catching toy that feels personal and unique. It’s your chance to add personality and flair, making the helicopter truly yours.
Painting And Decorating
Choose bright, non-toxic paints that stick well to plastic surfaces. Acrylic paints are great because they dry quickly and offer rich colors. You can paint the body of your helicopter in bold colors or create fun patterns like stripes or polka dots.
Try using a small brush for detailed areas and a sponge for larger sections to get different textures. Don’t forget to protect your work surface and let each coat dry completely before adding another. This helps avoid smudges and gives your helicopter a smooth finish.
Adding Details And Stickers
Details can turn your toy into a masterpiece. Use stickers to add windows, logos, or numbers—these small touches create a realistic look. You might even find aviation-themed stickers that fit perfectly with your helicopter design.
Consider gluing on tiny plastic parts like beads or buttons to simulate lights or rotor details. If you want to go a step further, use permanent markers to draw fine lines or add shading. What small detail can you add that would make your toy stand out?
Testing And Playing
Once your DIY plastic bottle toy helicopter is assembled, it’s time to test and play with it. This stage is exciting because you get to see how your creation performs and figure out any tweaks needed for better flying. Testing is not just about fun; it’s where you learn how small adjustments can improve balance and control.
Balancing The Helicopter
Balance makes a huge difference in how well your toy helicopter flies. If it leans too much to one side, it might crash quickly or spin uncontrollably. Try holding the helicopter by its center and check if it tips forward, backward, or sideways.
If you notice imbalance, add small weights like paper clips or bits of clay to the lighter parts. Move the weights around until the helicopter feels evenly weighted. This simple trick helped my first helicopter stay stable enough to hover for a few seconds, which was a big win!
Safety Tips For Play
Playing with your DIY helicopter can be thrilling, but safety should come first. Avoid flying it near faces, pets, or fragile objects to prevent accidents. Always supervise kids during playtime to guide safe handling.
Check the blades for sharp edges or cracks before each use to avoid cuts or breaks. If your helicopter has spinning parts, make sure fingers stay clear during launch and play. Have you thought about setting up a clear play area to keep everyone safe?
Tips For Customization
Customizing your DIY plastic bottle toy helicopter makes it unique and fun. Personal touches can improve its look and play value. Simple changes create big differences. Explore creative ways to make your helicopter stand out.
Using Different Bottle Sizes
Choose bottles of various sizes to change the helicopter’s shape. Small bottles work well for compact bodies. Larger bottles create a more robust look. Mix sizes for a layered design. Different sizes affect balance and flight stability. Test to find the best fit for your toy.
Incorporating Led Lights
Add LED lights to brighten your helicopter. Use small, battery-powered LEDs for easy installation. Place lights inside the bottle or on the rotor blades. LEDs make your toy eye-catching, especially in dim light. Secure wires neatly to keep the helicopter safe. This touch adds a cool effect during playtime.

Credit: www.youtube.com
Frequently Asked Questions
How Do I Start Making A Plastic Bottle Toy Helicopter?
Begin by gathering materials: an empty plastic bottle, scissors, glue, and sticks. Cut and shape the bottle carefully. Assemble parts step-by-step following the guide. Patience and precision are key for a sturdy helicopter model.
What Tools Are Needed For Diy Plastic Bottle Helicopter?
You need scissors, a craft knife, glue, a ruler, and paint. Optional tools include a hot glue gun for stronger bonds. These basic tools help you cut, shape, and assemble the toy efficiently.
Can Kids Safely Make A Plastic Bottle Helicopter?
Yes, with adult supervision. Kids can cut with safety scissors and glue parts. Adults should handle sharp tools. This project encourages creativity and motor skills safely when guided properly.
How Long Does It Take To Make The Toy Helicopter?
It typically takes 30 to 60 minutes. Time depends on skill level and drying time for glue or paint. Taking time ensures a neat, well-constructed toy helicopter.
Conclusion
Making a DIY plastic bottle toy helicopter is fun and simple. It uses common materials you can find at home. Kids and adults both enjoy building and playing with it. This project helps improve creativity and hand skills. You can customize your helicopter with colors and designs.
It also teaches recycling and caring for the environment. Try this easy craft for a fun, hands-on experience. Keep experimenting and making new toys from old things. Enjoy every step of your creative journey!